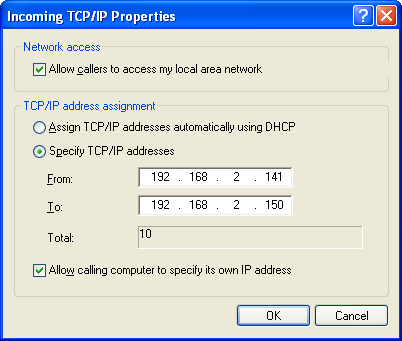
 | | Run the Create a new connection wizard in the Network Connections section:
- Select the option Setup an advanced connection.
- Select the option Accept incoming connections.
- Skip the Devices for Incoming Connections section.
- Select the option Allow virtual private connections.
- Assign the user names which are allowed to be connected.
- Open the Properties section for Internet Protocol (TCP/IP):
- Define virtual private network IP address range.
- Check the box Allow calling computer to specify its own IP address.
Finish the wizard. |
When the wizard finishes, Incoming Connections icon appears in Network Connections.
Windows XP is now ready to create VPN.
When first connection is established:
- it gets 192.168.2.141 as own IP address.
- assigns IP address to the connected computers from 192.168.2.142 to 192.168.2.150 in connection order.
In Windows explorer :
- if you enter \\\\192.168.2.141\\ to the address bar, you access the Windows XP computer itself over VPN.
- if you enter \\\\192.168.2.142\\ to the address bar, you access the computer which is connected firstly. |
|
